If you have ever contemplated turning one of those pre-built sheds that you see at Home Depot or Lowes into a hunting or fishing camp, this article is for you. I’m going to break down the cost to make this happen. We’ll start with essentials and then see what adding a few extras would tack on to the total cost.
Tiny homes may be all the rage but I like a little breathing room at home. For a weekend getaway location, however, I’m willing to make some compromises. This cabin won’t have all of the amenities of home but it’ll be a cozy safe haven for those outdoor adventures.
How Much Does It Cost To Make A Shed Livable? Based on the numbers in this cost analysis, a pre-built 12 x 10 shed can be made “livable” with an additional $1,000. This budget allows for insulation and interior wall sheathing as well as off-grid heating/cooling sources.
Let’s break down the science behind the numbers and see if building a hunting camp out of a shed is the right choice for you.
How To Make A Shed Livable
Everyone’s idea of “essentials” differs but for our purposes here we are looking at the strictest of criteria. That means a conditioned sleep environment with heating and cooling and the most basic living conditions.
Before we establish our essentials, let’s look first at what is conventionally considered “livable space”
Here’s the fundamental principles to making a shed livable:
- Conditioned air space – heating and cooling
- Electricity and Running Water
- Toilet, Shower, and Sink
- Basic Sleeping and living quarters
This sounds nice, but we may not be able to have all of this given the limited square footage that we’ll be working with. Additionally, depending on where you choose to place your cabin, access to the electric grid and running water may not be an option.
Given those limitations, let’s redefine “livable”.
What we are really looking to accomplish is to create a shelter from the environment that is comfortable and can sustain life. That means an enclosed area that will keep us safe from pests, predators, and weather. After all, if we didn’t care about that, we’d all just sleep on the ground outside. 🙂
So let’s get basic.
We need to create a conditioned space with at least some means for heating and cooling. That may not mean a central HVAC system but we can put something basic together.
Next, we do need a place to sleep. It doesn’t have to be a king size memory foam bed but we will require a place to lay our head.
We can stop there if we want. After all, toileting practices in the woods are not exactly novel and a good cooler will keep food and water safe to eat. We’ll consider those in our add ons later, but for now, let’s build a basic survival shed.
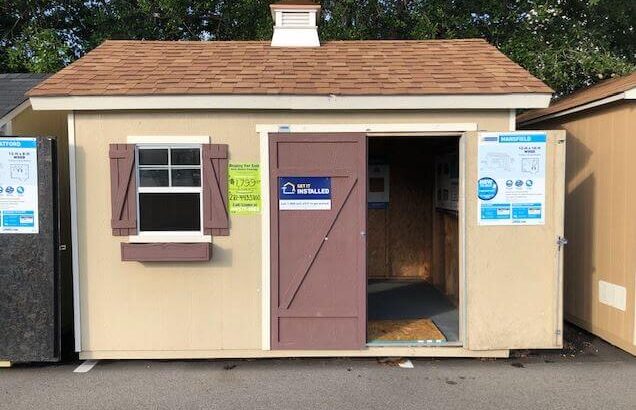
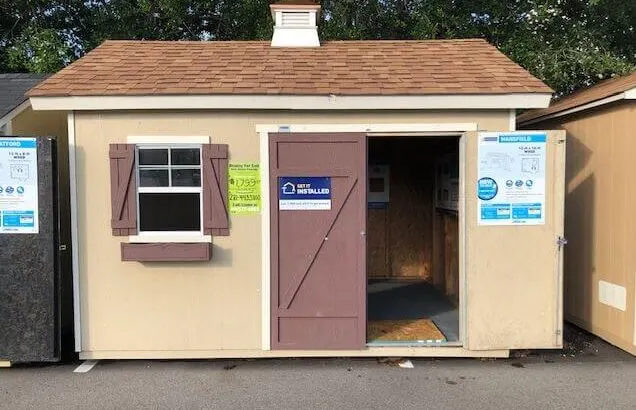
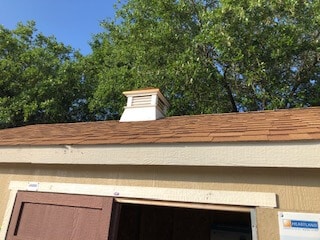
The Structure For Our Hunting Cabin Case Study – A Lowes Pre-Built Shed

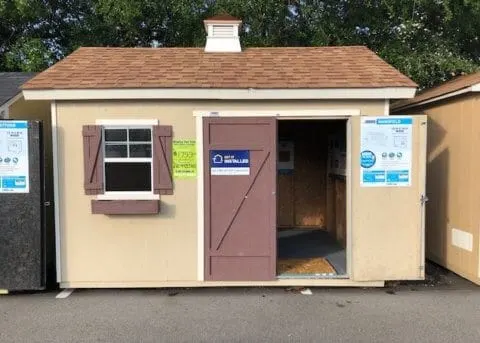
For this case study, we will be using a pre-built shed from Lowes. This shed is 12 foot by 10 foot and includes a window and venting (we’ll address the venting later). Price posted on the shed at the time that I found it was $1799. Taxes differ by state so I’m going to leave that out for our calculations but let’s round this up to $1800 for easy math.
Air-Sealing And Insulation (walls, Floor, ceiling)
Our first step to making this shed livable is going to be air-sealing all of the cracks and gaps with caulk or an expanding spray foam like Great Stuff. This will not only help to keep the thermal envelope of the shed cool or warm, but it will also prevent insects, rodents, and snakes from finding their way inside. Even if you were not going to insulate the shed, I still strongly recommend air-sealing to keep out those unwelcome guests!
Air-Sealing A Shed
We can air-seal this shed with four or so cans of Great Stuff. Considering an average cost of $4 per can, let’s budget $20. We’ll also want to add some weatherstripping around the windows and doors. This is pretty inexpensive stuff but considering the double door setup on this thing, It’s going to be something we want to take the time to do. Tack on an extra $10 for that project.
- Structure $1800
- Air-Sealing $30
- Total Cost So Far: $1830
Insulating The Shed
To truly make the space in this shed “livable”, we need to add insulation. The shed’s structure is on 24 inch centers and we have roughly 120 square foot of living space that needs insulated.
Walls


I’m not a big fan of fiberglass batt insulation but that is definitely the budget approach for a project like this. The walls are constructed of 2 X 4 studs so R13 insulation is our best bet.
This pack from Home Depot covers almost 150 square foot and is 23 inches wide to fill the wall cavities. Pricing at this time is right at $80.
We’ll be dealing with 8-foot tall walls after we add the ceiling (more on that later). So, 8 foot by 12 foot gives us 96 square foot for the back wall. We’ll figure the same for the front though it’ll be slightly less with the window and doors. That leaves the sides of the building which will be 8 foot tall by 10 foot wide. That’s 80 square foot for each of those.
All together we have 352 square foot of space to cover for the walls. Two of the 150 square foot rolls should cover it considering those doors and the window.
That’s $160 to insulate the walls
Ceiling and Floor
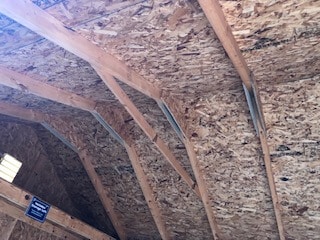

We have a couple of options when it comes to the ceiling. The first, and I’m not a fan of it, is to close off the vents that come with the shed and give our hunting cabin some fancy cathedral ceilings.
The problem with this is that we are not providing any ventilation for the shed at all this way.
The other option is to create a false ceiling by nailing up some OSB or other material. I’m going to assume that this is the route you choose in this cost analysis, so let’s insulate based on that assumption.
We will want to beef up the insulation in the attic and under the floor (yes, I think the floor needs this). We need at least R-30 insulation value for this. Owens Corning has the 24-inch faced (vapor barrier) rolls that you can purchase in-store or online at Home Depot. They run about $90 for 88 square foot of coverage.
We’d need two of these for our 120 square foot ceiling. I would recommend you stay with this thickness or better for the floors two so let’s account for that in our cost analysis.
So four of the R-30 rolls at $90 each would be an additional $360. Let’s add that into our running total.
- Structure $1800
- Air-Sealing $30
- Insulation
- Walls $160
- Ceiling $180
- Floors $180
- Total Cost So Far: $2,350
Attic Ventilation

As I mentioned earlier, we don’t want to just slap fiberglass batts between the roofing joists and call it a day. This shed has built-in ventilation in the gables and on top. We need to take advantage of that.
I would strongly recommend stapling up some radiant barrier foil to the underside of the roof joists. It’s relatively inexpensive, easy to install and can make a significant difference in the amount of radiant heat that is transferred into the conditioned space. You’ll want to use a perforated foil barrier like this one on Amazon for this so as not to trap in moisture.
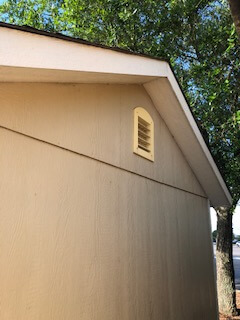
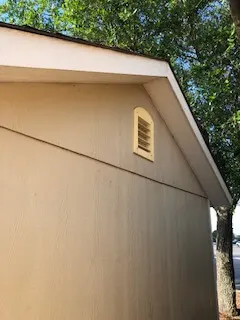
I’m going to budget $100 for this. I’m in the process of installing it in my attic and have found it to be well worth the investment. If you choose not to use it, you can reduce that cost.
- Structure $1800
- Air-Sealing $30
- Insulation
- Walls $160
- Ceiling $180
- Floors $180
- Radiant Barrier $100
- Total Cost So Far: $2450
Ceiling
Now for the attic space. We need to close off the conditioned air space in the shed from the attic. We’re also going to need to cover the fiberglass insulation in the walls. I’m going to budget for plain old OSB. These 7/16 inch 4 x 8-foot sheets run about $8 in my area.
We would need about 3 of these to create the ceiling and another 10 to wrap the interior walls. So 13 sheets at $8 each or about $105.
Ceiling Joists
We will also need some 10-foot studs to frame the ceiling (this is also where we’ll staple our faced insulation rolls to so that our attic is insulated).
10 foot 2 X 4s cost around $4 each in my area. Staying with the structures 24-inch centers build design, we can complete the ceiling framing with 6 studs. I recommend 7 though to account for the wall edges. That would be an additional $30 or so.
That brings our total cost to around $2585 so far.
Air Conditioning / Heating
Yes, it’s an amenity by many standards, but the truth is if severe weather hits you need to have a plan and the tools to survive an extreme weather event. This can be temperatures that are excessively high or low. What good is a shed that you convert to a hunting cabin if you can only use it in fair weather? Let’s plan for both heat and cold weather in our budget.
Cooling
At the very least, we are going to want a fan to blow directly on us. I’m a big fan (pun intended) of direct-to-solar space fans. These fans, like this one that Amazon carries, are inexpensive and allow you to mount a solar panel outside and circulate air anytime you have sunshine.
The challenge with these, of course, is that with no sun there is no fan. That means they aren’t an end-all-be-all solution. We need a way to circulate air at night as well.
This is where a solar powered portable generator can be a Godsend. These are essentially large lithium batteries that you can charge up during the day via solar panels and then use throughout the night. Depending on the size you get, you can power quite a bit with these and you don’t have to deal with gasoline or noise like you do from traditional fuel generators.
If you’d like to learn more about solar powered generators and some great options in this area, read my post on Seven Reasons Why A Solar Generator May Make Sense For You.
For now, let’s budget for a simple direct-to-solar fan so that we can circulate at least some air in the cabin. This will cost us around $115 on average.
That brings us to $2700
Heating
There are so many options for heating a shed that you are using as a hunting cabin. If we opt for a solar portable generator, we may be able to use a small electric space heater. On the other hand, there is less sunshine in the winter which means less energy for us to store.
I’d much rather place my bets in this situation on a portable, indoor-safe propane space heater. These are actually perfect for small, conditioned spaces like our hunting cabin. Heating up to 225 square feet, Mr. Heater F232000, for example, will provide a clean-burning heat source and includes an auto-off feature if the heater is tipped over, if low oxygen levels are detected, or if the pilot light goes out.

With over 2700 reviews on Amazon and an average 4.5-star rating, it’s a good bet that this is a solid, off-grid emergency heating solution.
You’ll need a propane tank for this which I’m not going to budget for since I have no idea what size you’ll use but you are looking at around $85 for the heater itself.
Shed To Hunting Camp: Final Cost And Breakdown
Assuming you’ll throw a used couch in this to sleep on, bring a cooler for drinks and sandwiches, and do your “business” in the woods, we are pretty much done with the “essential purchases” for this project. Here’s where we ended up.
- Structure $1800
- Air-Sealing $30
- Insulation
- Walls $160
- Ceiling $180
- Floors $180
- Radiant Barrier $100
- OSB For Ceiling $105
- 2 X 4s for Ceiling Joists $30
- Cooling $115
- Heating $85
- Total Cost: $2785
At this point, you have a conditioned space with some level of cooling and heating. For many people, this will be more than enough.
That’s actually not too bad. And that’s doing it right. You save a few dollars skipping air-sealing or radiant barrier but honestly, I don’t know that the savings is worth the decrease in comfort. When you are dealing with such a small living area, making it as comfortable and energy efficient as possible is not all that expensive.
But let’s see how what we could do to make this even better by expanding our budget just a bit.
What Can We Improve To Make Our Hunting Cabin Shed Even More Livable?
If there is one area that I would want to focus on to improve this shed, it would be the doors. The double swing-away style doors are not energy efficient. I would probably replace those or figure out a way to add insulation to them.
I consider these the one fault in this whole plan.
There are a couple of ways to address this. One is to add foam insulation board to the inside of the door. That would provide some level of insulation. Honestly though, I believe you would be better off throwing another couple hundred dollars into this project and replacing them with true exterior doors. You could get the double doors that have glass in them and are common on back doors of homes or you could resize the opening for just a single 32 inch door.
That’s the option I think I would go for. It makes the most economical and practical sense. The problem is that you would need to do something with the exterior siding once you decreased the door opening but it is just a hunting cabin after all so maybe that wouldn’t be too big of an issue.
Beyond this, we have a pretty awesome hunting or fishing cabin made from a converted shed. Not too shabby for what could amount to a couple of weekends of work.
Still, if we want to take this cabin to the next level there are a few things we can add to make our stay a premium experience.
Toilet
If we really want to take this shed to the next level, we can install a compost toilet that does not require access to running water to operate. These can be a little pricey but the idea of not having to run outside during a rainstorm to do your business may make one of these pretty enticing.
Wikipedia has an excellent overview of composting toilets if you are interested in learning more.
Bed / Sofa Combo
When you living in tight spaces, it’s smart to make the best use of space. An inexpensive futon couch that opens into a bed may be a great choice.
You can buy these new pretty inexpensively but for a hunting cabin you might find just what you need second-hand in your local classifieds or on Craigslist.
Cooking

Cold sandwiches will sustain you, but there’s nothing like a hot meal when you are relaxing at your hunting or fishing camp. Cooking on an open fire outside is a great experience unless the weather doesn’t cooperate.
You could build a small kitchen in this shed but if we stick with essentials all we need is a simple indoor-safe butane powered stove top like this one on Amazon. Being able to heat up a can of beans or something in a pinch can really make the difference between surviving and thriving.
Lighting
Want to really make your shed feel like a hunting cabin? Add some lighting!
There are lots of approaches to this. I’m a big fan of portable solar generators as I mentioned earlier. With one of these, you can wire up some LED lights in the cabin and make the place really feel like a home away from home.
Another option is to add solar-powered outdoor lighting around the outside of the cabin. See this post for details on how to take advantage of simple outdoor lighting solutions. I wrote that article with a back yard project in mind but it is 100% compatible with a hunting cabin made from a shed!
Refrigerator / Freezer
That portable solar generator I keep talking about… it can also power a small refrigerator/freezer if you get a decent size generator and a small, energy efficient refrigerator. It’s a great option for sustainable comfort and will make you forget that your hunting cabin was ever a shed.
Another option is a propane refrigerator. You could pick one of these up second-hand and probably save a lot of money. They are common in RVs and may be the right solution for your bug out camp.
Better Air Circulation
We can improve the air circulation in our hunting camp by hanging a couple of these portable DC powered ceiling fans. By running these off of a portable solar generator you could enjoy having air circulating in the cabin all day and night.
Conclusion
For less than $3000, we’ve accounted for purchasing a pre-built shed and making the necessary structural adjustments to ensure a comfortable stay in our new hunting cabin. We also saw that there are quite a few amenities that we can add to increase our comfort.
These would be especially important if we planned extended stays. For a weekend here and there, however, the basic $3000 project that we mapped out shows that a pre-built shed converted into a hunting or fishing cabin is an affordable solution.
If you would like to learn how you can apply these principles of air-sealing and insulation to make your home more energy-efficient, be sure to read my DIY Home Energy Audit guide that includes a free downloadable worksheet for you to use to assess your home.
Recommended Reading:
- 4 Cheapest Ways To Insulate a Shed Roof
- Why Does Your Shed Wobble? 6 Common Causes
- Should Metal Sheds Be Earthed? The Definitive Answer
As a homeowner, I am constantly experimenting with making the structure of my house more energy-efficient, eliminating pests, and taking on DIY home improvement projects. Over the past two decades, my family has rehabbed houses and contracted new home builds and I’ve learned a lot along the way. I share my hard-learned lessons so that you can save time and money by not repeating my mistakes.
Leave a comment
You must be logged in to post a comment.