
The comprehensive DIY Home Efficiency Audit!
If you are anything like me, you know that your home could be more energy efficient. Money spent needlessly each month on wasted or inefficient energy consumption can add up to hundreds or even thousands of dollars each year. But where do you begin?
It begins with taking a comprehensive, objective assessment of your home’s energy efficiency.
Here’s the steps to conducting your own FREE home energy audit:
- Step 1 – Assessing The Thermal Envelope
- Step 2 – Mechanical Systems Condition and Efficiency
- Step 3 – Major Appliances Condition and Efficiency
- Step 4 – Attic Ventilation and Ducting
- Step 5 – Identifying “In Use” and Phantom Energy Consumption
We are going to walk through each of these steps and evaluate, in detail, the current condition and energy efficiency. Are you ready for this?
Please note – You are likely to run across issues that you are unable to address. I encourage you to still include them in your assessment checklist. Even if it is something that you are unable to correct, it does impact the energy efficiency of your home and in order to obtain a comprehensive assessment we need to account for everything, not just the parts we are going to fix.
Needed Tools
Before we begin, there are a few essential tools that you will need in order to complete your home energy audit.
Infrared Thermometer or Infrared Camera – This tool provides accurate surface temperatures and provides invaluable insight into the efficiency of the thermal envelope.
Watt Meter – Used to check the “in use” and “at rest” energy consumption of electronic devices throughout the home. We will be using this device extensively.
Ruler – this will be used to measure the thickness of attic insulation if you have an unconditioned attic.
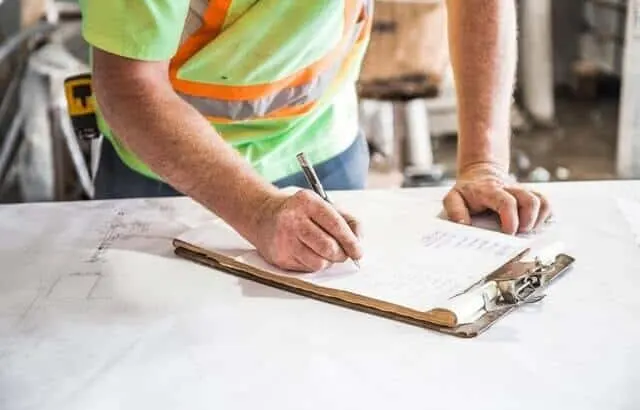
Pen and Checklist – Print out this checklist (Microsoft Excel or PDF versions available below). We will be using it to assess and evaluate your home’s efficiency.
Note: Since the objective of the home energy audit is to assess efficiency, we will not be performing maintenance or improvements in this phase of the process. Our goal at this time is to simpl obtain an accurate measurement of the overall efficiency of your home.
If you are inclined to go ahead and correct some minor errors along the way, that is perfectly fine. What I would encourage during this phase of the home improvement process, however, is to simply gain insight and learn where efficiency improvement opportunities exist and make note of them on your checklist.
Step 1 – Assess Your Home’s Thermal Envelope
Understanding the current effectiveness of the thermal envelope of a structure is an essential step to ensuring an efficient home.
What Is A Thermal Envelope?
Simply speaking, the thermal envelope of your home consists of the barriers that exist within the structure of your home to ensure that conditioned air stays in and unconditioned air stays out.
These usually consist of not only the walls and roof themselves but a combination of insulation, caulk, expanding foam spray, and any other exterior barrier between your conditioned air space and the outside.
For more information see What is the Building Envelope & How Does it Affect Insulation?
Thermal Breaks And Why They Matter
Weaknesses in the thermal envelope of your home are usually at joints, places where solid barriers meet. A simple example of this that is easy to see is in a house’s door. It is common for homes to have air leaks around a door since there are places where the two materials join.
Throughout this audit, remember to keep your eyes open for places along the exterior walls and ceiling where materials join as these are often the easiest breaks in the thermal barrier to address.
Assessing The Exterior
We will begin this audit process by carefully assessing the exterior of the home. Many of these areas will also be inspected from inside once we move to the interior inspection.
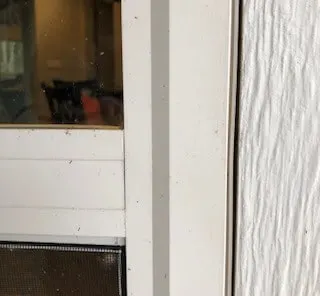
The first area we want to inspect will be the windows. Are there any visible cracks between the window and the framing? Does the window shut completely? Is it a dual pane or better window? Make sure to make note of any areas of concern on your checklist.
Notice the gap between the window and frame in this picture.

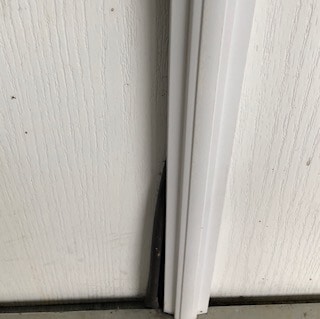
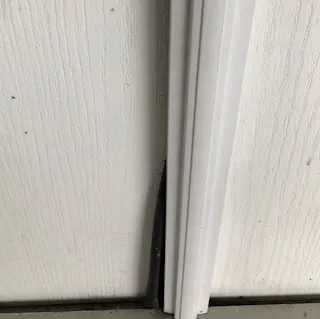
Next, let’s check the exterior doors for any signs of breaks in the thermal envelope. Take note of all the places where materials meet. We will be inspecting these thoroughly from the inside but at this point our goal is to identify any air leakage opportunities that are visible from the exterior.
Here’s an example of an issue on my back door where the “professional installers” failed to properly secure the weatherstripping. You can see how it is actually sticking out instead of compressing when the door closes.
With these major areas out of the way, it’s time to focus on the less obvious breaks in the thermal envelope.
Carefully inspect electrical outlets, water faucets, and mechanical system wiring and pipes that enter through the exterior wall. There are often many opportunities for air leaks in these thermal envelope breaks. Be sure to note any joint that is not completely sealed. This may seem trivial but remember we are conducting a comprehensive evaluation of your home’s energy efficiency.
Unconditioned Attic Space
If your attic is conditioned, skip this step as you will be addressing it along with the interior assessment of the thermal envelope.
Begin by getting an overall assessment of the insulation blanket. The insulation should cover the entire floor of the attic over insulated areas. Soffits, porches, and garages are not usually insulated (unless the garage is a conditioned space in your home).

Make note on your checklist of the type of insulation – rolled or blown.
Look for any obvious disparities in the consistency of the insulation blanket. Using your ruler, measure the thickness of the insulation. If the insulation blanket does not appear to be the same thickness throughout, measure at the thinnest area and mark your findings on the checklist.
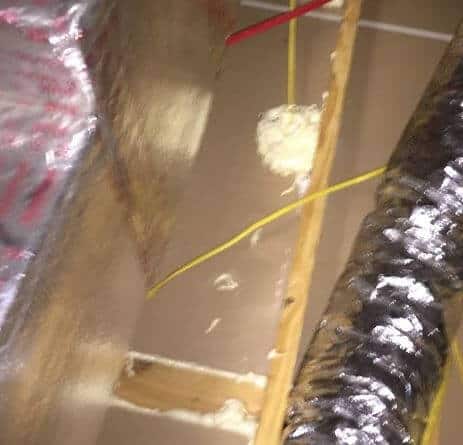
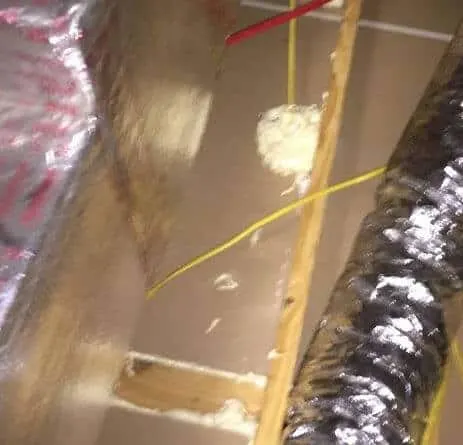
One of the biggest causes of efficiency loss in a home is air leaks. Look for an area where you can see a pipe or electrical wiring going through the insulation into the home.
Move the insulation and look to see if the hole that it goes through was sealed with foam. If not, you may want to check another spot or two, but that’s a good indicator that the attic was not air sealed prior to insulation being installed. Make certain you make note of that on the checklist!
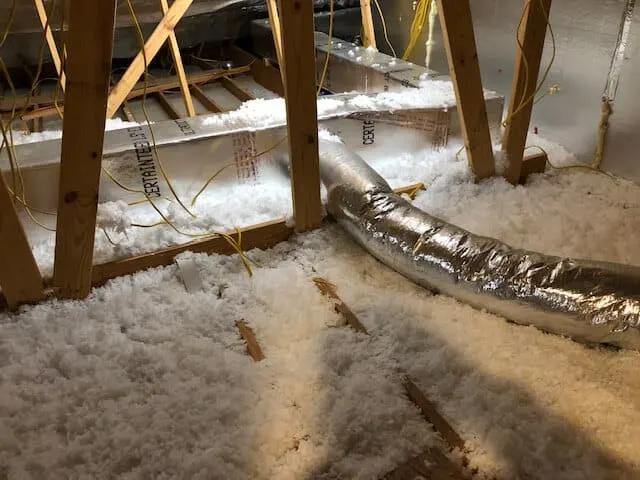
Below is an example of how I air sealed the attic’s thermal envelope breaks before insulating. This is what you might expect to see under the envelope where wires and piping extrude if the home was air-sealed properly.
Does the home have any mechanical systems in the attic such as a water heater or air conditioning unit? If so, it may be a good idea to get the information on those systems while you are already in the attic. (See Mechanical Systems later in this article).
Are there water lines running through the attic? Are they insulated?
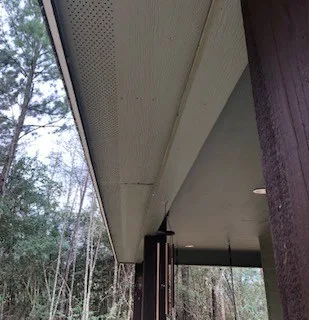
Are there HVAC ducts running through the attic space? Take a moment to look at how those are joined together. Have a look at this article that reveals a serious error that I discovered in my air conditioning ducting system although it was installed by professional installers from a reputable company.
You may not be able to tell what the R-value is of the ducting system but if you see it listed on it, make note of that. The
Note: If you have metal ducting and it is not insulated, make note of that on your checklist as it is a significant energy efficiency issue that you will want to ensure that you address! Read this report from Energy Star.
There is one more area that you need to check while you are in the attic and that is ventilation. Depending on your home’s attic ventilation system, you will have passive or active exhaust vents near the peak of the attic and soffit venting for intake.
In most situations, homes suffer from a lack of intake venting, not exhaust. If you have any type of active exhaust
If you do not, that powered attic vent will literally suck conditioned air out of all of those unsealed breaks in the thermal barrier that we just identified.
Make a note of the type of exhaust ventilation and look to see if the soffit venting is free of insulation or other obstructions.
Assessing The Interior Thermal Envelope
As we move into the inside of the home, you will want to have your infrared thermometer or infrared camera in hand. We are going to start
We will begin again with the windows. Using your infrared device, compare the temperature of the window itself to the adjoining wall. You will notice that there is a marked difference between these two. Write that down on the checklist.
Next, study the window seal and all areas around the window looking for joints that are not completely sealed. If you can see a visible crack, make note of it.
Next, take time to examine all exterior doors and pay particular attention to the condition of the weather stripping. If it is showing signs of aging and decay, make note of that on your checklist. Also, look at where the corners of the stripping meet. Is there a noticeable air gap where conditioned air could be escaping? This is an often overlooked issue with weatherstripping.
Step back from the door and look for any visible light coming in around it. Check the top, sides, and bottom. Pay particular attention to the area under the door. This is a common area for air leakage.
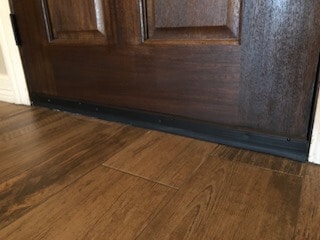

I could see light from underneath my front door until I installed a bottom door seal.
Point the infrared device at the door, note the temp, then point it at the wall and mark the difference on the spreadsheet. If the door has glass in it, note the difference in the glass temperature.
It’s a good idea at this point to slowly run the infrared device around the edges of the door. There will be some variance but what you are looking for is a sharp change in temperature. If you identify one, mark it down.
With windows and exterior doors completed, the next step is to assess the exterior walls and ceilings.
The first place to note is electrical outlets on exterior walls. These are great examples of inherent design flaws. You see, behind those outlets is a plastic or metal casing that has holes in it for the wires to run through. Conditioned air easily passes the thermal envelope through these.
Your infrared device will likely reveal a lot of information at this point of the assessment. If you are using an infrared camera, you may be surprised to see hot or cold spots in your walls and ceiling, especially in corners and around venting and light fixtures.
It’s important to turn lights off and leave them off for a while to cool down so that you are not picking up the ambient heat from the light. Make note of your findings. These will be very important later.
The infrared device will also pick up areas of inadequate insulation in the walls and ceilings. The wall issues can be difficult to address but make note of them so that you are aware of where they are.
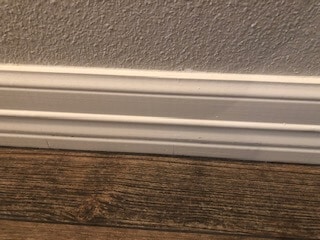
If you have crown molding, look to see if it is lined with caulk to
As you are walking through the house assessing these areas, there are a few key factors that you need to take note of.
Bathrooms
If your bathrooms have exhaust fans, mark that on the spreadsheet and circle it with a big red pen mark. We want to make absolutely certain that we deal with these.
Check under the sinks where the plumbing goes into the wall. Is that area air sealed? If not, make note of it. If it is on an exterior wall it’s even more important.
Utility Room
If your dryer vents out an exterior wall, check to see if it is air sealed. If not, mark it on the list.
Kitchen
Under-sink plumbing should be checked here as well. This was likely checked during your whole house walkthrough but make sure you account for these.
Garage
If you have a garage it is likely that two of the walls will be interior walls. Note any outlets or other breaks to the thermal envelope.
At this point, I suspect you are beginning to see just how thorough this process is intended to be. The devil is in the details as they say, and nowhere is that truer than in a home energy audit.
Step 2 – Mechanical Systems Condition and Efficiency
The mechanical systems in your home account for a significant percentage of the energy that you use. Next to the thermal envelope of your home, these systems are likely the second largest expense impacting your monthly energy bills.
Your situation here will vary depending on whether you have all electric, or electric and gas systems. In either case, we want to take the time to thoroughly inspect the condition and efficiency of these units.

For mechanical systems and appliances, we are going to be collecting important
Don’t worry, we will walk through every step of this process when the time comes but for now, let’s focus on gathering all of the information that we can about the mechanical systems in your home.
Cooling and Heating Systems
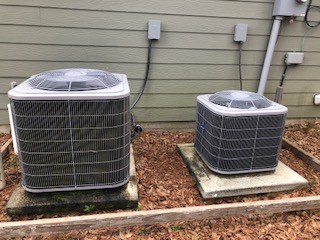

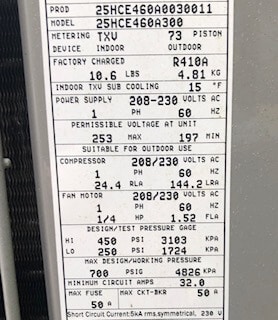
For the air conditioning and heating system, you will access to both the indoor and outdoor units. Collect as much information as you can from the manufacturer’s label. I recommend taking a picture of it on your smartphone for easy reference. Make a quick note of the general physical condition of the system upon inspection – “new, good, fair, or poor”.
Check the condition of the filter and mark that down or replace it now.
Water System
Do the same for the water system, whether it’s tankless, traditional, or hybrid. We want to collect manufacturer information at this stage. Does the water tank have an insulation wrap around it? Are the pipes leading out of the tank insulated? Mark it on your checklist.
Fireplace
If you have a fireplace, the main thing we need to assess for the purposes of our home efficiency audit
Step 3 – Major Appliances Condition and Efficiency
The process here is the same at this point as it was for mechanical systems. We are simply gathering data. Walk through your home and snap a picture or write down as much information as you can on the brand, model, etc. of each major appliance.
Kitchen
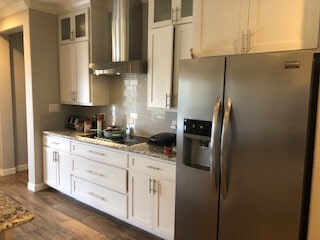
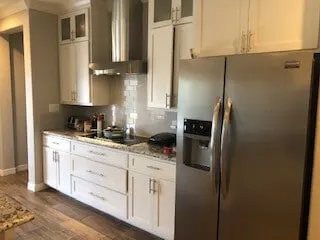
Account for your refrigerator, freezer (if you have a separate one), microwave, oven, dishwasher and any additional major appliance. Simple plug in appliances such as Toasters and blenders are not included in this assessment but don’t worry, we are going to account for their energy use later!
If you have an oven vent, make note of the brand. You will likely not be able to find see the manufacturer’s label.
Utility Room
Your washer and dryer will need to be accounted for. If you cannot access the manufacturer’s label, take note of the brand and if there is any indicator of the specific model be sure to add that to your checklist.
If you have any additional major appliances, follow the same process.
Step 4 – Attic Ventilation and Ducting
If you followed my advice during the thermal envelope assessment of the attic, you have already gathered the essential information that you need regarding attic ventilation and ducting. If you skipped over this part, then it is time to go back into the attic and make these assessments. See Step 1 for what you need to collect.
Step 5 – Identifying “In Use” and Phantom Energy Consumption
Remember that toaster and blender that we skipped over earlier? Now we are about to get down to the nitty-gritty of daily energy consumption use in your home.
This is where the Watt-Meter will come in. This device measures the energy usage of any 120 volt electronic device plugged into it. We are going to use this device to measure and record all of the devices plugged in throughout your home. This is an extensive process but can be very enlightening.
There are two energy use measurements that we want to account for: in-use energy consumption and at-rest energy consumption.
Why measure at-rest energy consumption?

It may seem pointless to measure the amount of energy a device uses when it isn’t in use. Many people believe that electronic devices, when turned off, do not consume energy. Unfortunately, this is not true at all.
At-rest energy consumption, also known as “vampire energy” or “phantom energy” use, are actually a significant, preventable energy waste source for most homes. While the numbers may look small at first, they add up quickly when you stop and consider the number of devices that are plugged in all over your home right now that are not actively being used.
But our goal here is to just get clarity and to do that, we need to first go through the house and measure the in-use and at-rest energy consumption of every plugged in device.
Did You Know? According to the Department of Energy, phantom power consumption is responsible for around $100 per year for the average household.
Start with the larger items as those will likely be consuming the largest amount of at-rest energy. This will be enlightening and will inspire you to go on a phantom energy hunt for every last energy thief throughout your home.
Watt-meters are most accurate in measuring phantom energy when they are left in place for 24 hours connected to an unused device. I lack the patience for this so I usually obtain 1-2 hours of data and multiply by a factor or 24 or 12 respectively to give me a rough estimate of the phantom energy usage.
If I come across a device that surprises me with larger numbers in energy usage, I’ll often go back and do a 24 hour audit to get a more accurate measurement of that particular device.
What I want you to do here is to be deliberate and patient. Plug the watt-meter in between each device. Leave it for an hour and check the phantom energy use. Mark that down. Next, turn on the device and let it run for the normal amount of time that is would be in use. Make note of that energy use on your checklist.

This takes time, but clarity is power. Each of these at rest phantom energy costs represents a break in the comprehensive energy efficiency of your home.
People are always looking for the one-shot wonder to energy savings but the truth is, high utility bills are usually the culmination of many small breaks in the overall energy efficiency of a home.
You can buy the most expensive, high-efficiency air conditioner in the world, but if you leave the windows open while you run it, you are still going to have a high electricity bill.
You have made it this far with me. You are not someone who’s just looking for a shortcut. Let’s get this done.
What’s Left?
So we have accounted for the energy consumption and efficiency of almost everything in and around the home. Depending on your situation, we may be done with this part. But, if you have a swimming pool, a shop, or any other areas where energy is consumed, you’ll need to apply these same principles and account for the energy consumption of those areas.
Time to Research


With the walk-around assessment completed, it’s time to do a little research. Remember the data we collected on your mechanical systems and appliances? We are now going to use that information to seek out the energy efficiency specifications and other considerations of each of those.
This process should not be too difficult, thanks major manufacturer’s embracing the internet and placing their owner’s manuals online.
What I recommend first, however, is simply typing in the brand and model number of your appliance along with something like “efficiency” or “energy consumption”
For example, I typed “frigidaire fghs2631pf4a energy consumption” into Google and quickly found the manufacturer website with the information I needed. Now, since the refrigerator has a 120-volt plug I also used the Watt-meter to get my own energy consumption rating, but this is the process to go through and find specifications for your appliances and mechanical systems.
There is a seven-step process for determining if an appliance or system upgrade is worth the investment. The seven steps involved determining each of the below factors:
- Age of current system
- The anticipated remaining lifecycle of the current system
- Energy use of the current system
- Energy use of proposed system upgrade
- Projected annual savings yield for the upgrade
- Timeline for return-on-investment
- Anticipated years of use
I have written a complete walk-through of the seven critical steps to determine if an appliance upgrade is worth the investment. Please go to that post to work through this stage of the audit. But here’s the basic steps:
Age of current system
Determine the age of the current system or appliance from the manufacturer’s label. If the age is not listed, make note of the model number and you can quickly find this online.
The anticipated remaining lifecycle of the current system
How many years of service is the current system anticipated to last. I provide a link to an extensive list of average lifecycles of all major appliances in my full walk-through.
Energy use of the current system
This is calculated using a website that I give you in the walk-through. We break down amps to watts and watts to dollars so that you can really see what the financial impact of your current appliance looks like.
Energy use of proposed system upgrade
This step involves researching high-efficiency upgrade models and identifying the energy use of those models.
Projected annual savings yield for the upgrade
With a little math, we can quickly calculate how much money we stand to save in energy costs each year with the upgrade.
Timeline for return-on-investment
This is where the rubber meets the road. Although you stand to save money each year with an Energy Star appliance upgrade, the question is how long will it take before you recoup that initial investment.
Anticipated years of use
The final piece of the puzzle is the length of time you expect to use the upgrade. If you are looking at upgrading to an energy efficient air-conditioning unit but plan to move within the next five years, the annual savings may not justify the cost for that short of a period of time.
Please don’t peruse over this step in the energy audit. It is very important to take a full inventory of the seven steps for each appliance and mechanical system in your home. This level of clarity will give you the insight you need to make informed decisions.
Go to this page and do the complete walk-through for each of your appliances now!
Conclusion
Believe it or not, we are finally done with the audit. You now have a truly comprehensive, energy efficiency assessment of your home.
So what do we do with all of this information? Well, it’s time to begin addressing all of those energy loss issues we identified.
Work your way through the list a little at a time. Focus first on the quick and easy fixes then you can advance to the more daunting tasks. Every little improvement you make will add to the overall energy efficiency of your home.
Read my other articles for great ideas on simple solutions to improving home efficiency. You’ll find ways to address a lot of the issues you have identified from this audit.
All my best!
As a homeowner, I am constantly experimenting with making the structure of my house more energy-efficient, eliminating pests, and taking on DIY home improvement projects. Over the past two decades, my family has rehabbed houses and contracted new home builds and I’ve learned a lot along the way. I share my hard-learned lessons so that you can save time and money by not repeating my mistakes.