
If you are planning a remodel to a basement or garage on a slab, you will need to secure the bottom plate of the walls to the concrete. I’ve had to do this many times over the years and there are a number of ways to do it.
Attaching the bottom plate of a wall to a concrete floor can be done using any of the following methods:
- Cut nails (aka masonry nails)
- Concrete nails
- Concrete screws
- Wedge anchors
- Construction Adhesive
No matter the reason, attaching a 2×4 bottom plate to the concrete requires special tools and fasteners. In addition, care should be taken to make sure moisture cannot penetrate the wood and cause damage.
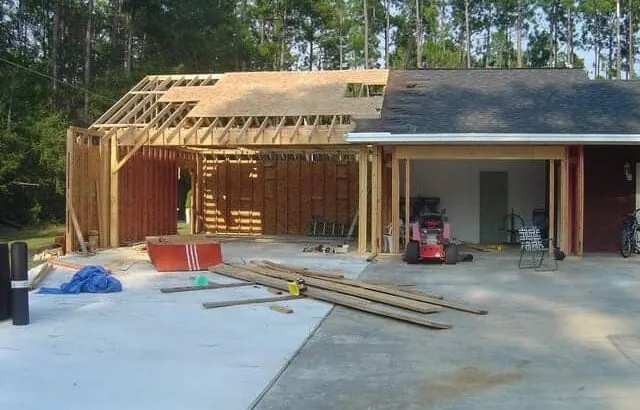
The main image from this article is a garage add-on from a previous home. My wife and I built those walls so I’ve been down this road before!
This guide will discuss important preparation to control for potential moisture damage, as well as cover the many options available for fastening the bottom plate to the concrete floor.
Important Preparation for Moisture Control
Any concrete surface can accumulate excess moisture, as water condenses on its cool surface. If you are working on a concrete foundation slab at ground level, protecting against moisture damage is the first line of defense.
Especially if you are remodeling a basement, moisture problems can lead to serious rot damage on the newly added walls, as well as cause mold and mildew. This can lead to health problems and larger repair work down the road.
Basements are notorious for excess moisture. There are 3 main sources of water in a basement (source):
- Water penetration from rain or ground-water
- Moisture from normal interior sources, such as laundry rooms, bathrooms, and cooking
- Condensed humid air from outside sources
While these problems may require major renovation work, such as foundation repair or correcting inadequate gutter and drainage systems, some simple fixes can lessen the affects of moisture damage.
Simply removing sources of interior moisture with adequate ventilation and dehumidifiers can help. You can also apply a moisture barrier coating, such as HydroHalt (link to Home Depot), to help seal the space.
Options for Bottom Plate Moisture Protection
One option is to use pressure-treated 2×4 lumber made for damp areas as a bottom plate, in conjunction with properly coated fasteners, such as hot-dipped galvanized or stainless steel, in contact with treated lumber.
This will protect the bottom plate from moisture damage that can compromise the integrity of the wall.
Another option is to use a barrier, such as a sill gasket (link to Amazon).
A sill gasket is a foam strip used to seal against air leakage, moisture, and insect intrusion in many applications. I chose to have this done in my new home.
Some builders say that you can use a sill gasket in conjunction with a regular, non-pressure treated pine or fir bottom plates. Best practice, however, is to use both the sill gasket and treated lumber as a bottom plate.
Although the sill gasket helps to prevent moisture from seeping in, standing water next to the bottom plate could still result in damage if non-treated lumber is used.
These options will protect the bottom plate from moisture damage that can cause rot and health issues.
Now that you understand the importance of preparing for moisture control, let’s look at the various options for attaching 2×4 bottom plates to concrete floors. First, you must choose the preferred fastener.
Fastener Choices for Attaching 2×4 to Concrete
- Cut Nails: Also called masonry nails, cut nails have a particular shape. They have a square, tapered shaft with a square tip. Cut nails are driven through the wood and concrete just like a normal nail, albeit with much force needed.
They are cheap and hold extremely well when driven at least 3/4 inch into the concrete. (source)
- Concrete Nails: Concrete nails are shaped like regular nails, only thicker. The shafts are surrounded with striations to make them hold more strongly. The steel is also hardened so they won’t bend on impact.
Concrete nails are also pounded into concrete like nails.
- Screws: Screws can also be driven into concrete as long as you first drill a proper-sized hole. Typically, a box of masonry screws will come with a masonry drill bit sized to the screw diameter.
Many sizes and lengths are available, as well as different head designs. Tap-cons are a common name brand screw used for securing to concrete.
- Wedge Anchors: Wedge anchors consist of a threaded stud, washer, and hex nut. They have a mechanism that will expand once installed and secure the bolt into the concrete.
Wedge anchors are very permanent and can only be cut off if you ever need to remove them.
- Construction Adhesive: Construction adhesive, such as Quikrete (link to Amazon), can be used to secure a wood bottom plate to a concrete floor. However, it is usually recommended to use this in conjunction with one of the above fastener choices.
If you only need to drill a few holes through the concrete, you can do the work with common tools. If the job is bigger, you may consider purchasing or renting a machine. Let’s compare the various tools used to attach wood to concrete.
Tool Choices for Attaching 2×4 to Concrete
Standard Drill and Hammer:
If you are only looking to to attach a handful of anchor points to the concrete, you can easily use a standard drill and hammer. For more power, a hammer drill can also be used.
This method will work for cut nails or concrete nails. For wedge anchors and screws, you can use the same method until the final step.
Note: Always wear a mask, ear protection, and goggles to protect yourself when drilling through concrete. The work is dusty and loud, and can potentially throw particles into the air.
- Drill pilot holes through the bottom plate in the locations you are attaching it to the concrete, making sure to penetrate the concrete slightly to mark the locations.
- Remove the bottom plate and vacuum the dust away from the hole.
- Drill pilot holes through the concrete, using a drill bit the same size or slightly smaller than the nail diameter. Drill deep enough for the entire nail to reach the bottom.
- Again thoroughly vacuum the hole to remove debris that will foul the nail’s ability to penetrate into the hole.
- Reposition the bottom plate 2×4 over the pilot holes, and hammer the nails with a framing hammer. A framing hammer has a heavier weight and milled face that will make driving the nail easier.
Variation for screws: If you are using screws, follow the same steps as above, except use the standard drill to drive the screw into the concrete at the last step.
Variation for anchor wedges: If you are using anchor wedges, the steps again remain the same, except for the final wedge installation. Use a hammer to tap the anchor into the hole until the washer is flush with the bottom plate.
Then use a wrench to tighten the head until it’s snug, then tighten more to add torque.
Powered-Actuated Tool:
If you are looking at a larger job, you may want to purchase or rent a power-actuated gun. Common brand names are Hilti or Ramset, but there of course are others. Power-actuated guns use direct fastening technology.
This technology uses small explosive cartridges that drive the nail into the concrete. They usually require at least 5 pounds of pressure against a hard surface to engage the trigger.
They use a black powder charge to power the discharge (source).
To use these, you load a .22 caliber shell, press the nose against the bottom plate and pull the trigger. The discharge of energy will drive the fastener into the concrete, with no pre-drilling or pre-marking necessary.
This is, without question, my favorite approach. It’s fast and doesn’t require a lot of manual labor.
Power-actuated tools are by far the fastest and easiest way to attach 2×4 bottom plates to concrete. You can rent them from most home improvement stores, or purchase one if you would prefer.
You must use the specified fasteners designed for powder-actuated tools, called drive-pins. These are sold in boxes and come in different lengths and thicknesses. They include washers that stop the nail from penetrating all the way through the wood and secure the concrete and wood together.
In addition, you must purchase the proper .22 caliber powder loads, also sold in packs.
Recommended: Ramset Power-Actuated Tool (Link to Amazon). Powder loads and drive pins are also available.
Conclusion
Regardless of your purpose for attaching 2×4 lumber to concrete, the methods to use require some preparation, special tools and fasteners, and caution.
If you want to do the job mostly by hand and only have a few connection points, then concrete nails or screws are probably your best bet. You can use a standard drill or hammer drill to prepare the hole, and then drive the nail or screw into the concrete.
If you would prefer a quicker, easier method, or have a large job to complete, purchase, or rent a power-actuated tool. It will drive a special nail through the bottom plate and into the concrete with a single pull of the trigger.
Either way, make sure your space has a proper moisture barrier in place. Concrete often causes water to condense on its cool surface, so any moisture present in the room can cause moisture problems in the bottom plate. Always use pressure-treated lumber, a moisture barrier, or both.
As a homeowner, I am constantly experimenting with making the structure of my house more energy-efficient, eliminating pests, and taking on DIY home improvement projects. Over the past two decades, my family has rehabbed houses and contracted new home builds and I’ve learned a lot along the way. I share my hard-learned lessons so that you can save time and money by not repeating my mistakes.