
Understanding the effectiveness of your home’s energy efficiency can make the difference between an electric bill that makes you smile and one that makes you cringe. While there are countless areas where your home may be leaking dollar bills, there are a couple of simple tools that you can use to quickly gauge the efficiency of your home.
By using of a Kill-O-Watt energy use meter and a Thermal Laser Temperature Detector, you can quickly determine the amount of energy being used by appliances and electronic devices as well as identifying locations where insulation may not be adequately encapsulating the structure.
Let’s take a look at how you can get a firm grasp on your energy efficiency and simple steps that can be taken to lower your electrical consumption as well as your monthly power bill!
How To Determine How Much Electricity A Device Uses
According to the US Energy Information Administration, roughly 30% of a homeowner’s energy usage results from electronics. This includes appliances, lighting, and all of the electrical devices at are plugged in throughout your home.
Every electronic device in and around your home is a co-conspirator in increasing your monthly electric bill. Each may have a different level of involvement but all are guilty parties. While it is not feasible to go around the house and constantly unplug any device not actively in use, it is worth knowing the level of power consumption that every device in your home requires, both while being used and while at rest (more on this later).
The Kill A Watt Electricity Usage Monitor (available on Amazon) is a digital power consumption monitor has both a male plug and a female electrical plug socket. You plug your device into the Kill A Wall monitor and then plug the monitor into the wall. Your electronic device will work as usual but the meter will monitor and track the power consumption of the device.

The normal recommendation is to plug in the Kill A Watt monitor and use your device as you normally would for a 24 hour period and then log that consumption (a digital readout provides the wattage used during this timeframe).
What I recommend, in addition to the above, is to also obtain a 24-hour power consumption baseline for the device by not actively using it for the 24 hour period. This may seem silly but you will be surprised to see just how much electricity your electronic devices are using even when they are sitting idle and unused.
This power consumption when devices are not being used is known as phantom or “vampire” energy loss and it can account for a substantial impact on your monthly electrical bill. While getting phantom power consumption under control won’t result in your electrical company sending you a check each month, it is one part of a complex process of identifying and managing energy use and home efficiency and should not be overlooked.
Appliances – Take Note of The Energy Guide Label
Large appliances such as water heaters come with an Energy Guide Label that clearly shows the amount of energy that the appliance is expected to use and an estimated cost based on that usage.
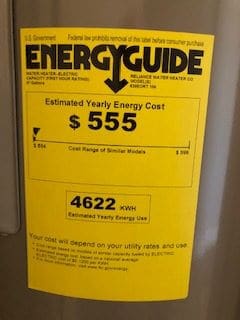

If you are in the market for a new appliance, it’s worth the time to pay close attention to these labels. Energy efficient appliances can save much more than the added upfront cost over their lifetimes. I will be covering this in detail in another post but for now I recommend just getting a pulse on the energy usage of existing appliances within your home.
How To Stop Phantom Energy Loss
Once you have identified electronic devices that are consuming abnormally large amounts of power while “at rest”, you will want to get a handle on that power usage. Products like the Tripp Lite 7 Outlet (Timer Controlled) Surge Protector Power Strip are excellent for both protecting your expensive electronics from electrical surges while at the same time providing a simple and reliable means for restricting their power consumption during hours that they are not in use.

This surge protector comes with time-controlled outlet banks (four outlets in one bank and three in the other) that allows you to set “off times” where electricity is automatically shut off to those devices. Where the separate banks could come in handy is if you had several devices and wanted to shut off power to some but not all. For example, you could set your television, cable or satellite receiver, surround sound system to shut off power from
These are the types of products that pay for themselves over time in power usage savings. You make the investment up front and then let it do the work of saving you money while you sleep each night.
Have a look around your house at all of the devices that are plugged in right now. How many of those are drawing some level of power at night that they really don’t need to draw?
For smaller, single devices, I used to like these 7-day programmable timer outlets but they feel a bit antiquated in the way they look and operate. I recently began upgrading my phantom power consumption efforts with the use of Amazon Alexa supported outlets like this one that can be set in my Alexa mobile app to automatically turn on and off at certain times. It seems to be a pretty solid solution so far and I love the automated approach to energy savings.
Identifying Home Air Leaks And Inadequate Insulation Issues
Power consumption is only one piece of the puzzle. To really get a handle on your home’s efficiency you have to ensure that the structure is not allowing unconditioned air in or letting conditioned air escape out.
Obvious culprits in this are doors and windows but the conspiracy runs much deeper. Recessed lighting, air conditioning vents, and countless other breaks in the permeable wrapping of your structure, heck even areas that have inadequate insulation, are continuously allowing unconditioned air in and letting the conditioned air that you are paying for to escape out.
We’ve got to this fix this.
But first, we’ve got the find all the leaks.

An Infrared Digital Thermometer, like this one that I purchased on Amazon, is an amazingly simple and inexpensive tool to scope out and pinpoint areas in your home where leaks in the structure of your home are costing you money.
This is a simple process. All you have to do is walk around your home and point the infrared thermometer at your walls and ceilings. The first places you will be inclined to check will be light fixtures but don’t forget wall outlets. They can allow a lot of air leakage because of the way the wire box in the wall is designed.
Stopping Air Leakage In Your Home
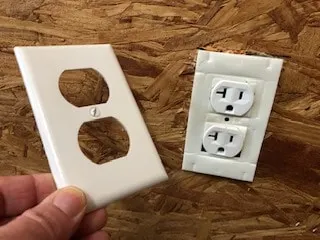
For wall outlets, I have gone through my house and applied these wall plate insulation gaskets and they really make a difference. When I removed the wall plates, I could immediately feel the heat from the unconditioned air outside.
The gaskets compress against the wall when you replace the outlet cover (wall plate) and create basically an air seal to prevent that unconditioned air from getting in (as well as stopping the conditioned air that you are paying to heat or cool from getting out!)
Note – if you have outlets in your garage you will definitely want to insert these gaskets. You stand to have a lot of air leakage through these!

Another area where you’ll likely notice temperature differences is in the corners of rooms, particularly corners of exterior rooms. These areas often don’t get blanketed with sufficient insulation.
While it can be challenging to get into an attic and address this, depending on the difference in temperatures that the infrared thermometer shows, it may be worth the effort. The only way to know for sure is to compare the temperatures of corners with an area of the ceiling somewhere near the center where the insulation is likely the thickest.
When we first built our home, I took the time to go through the attic with more than a case of cans of Great Stuff Spray Foam and air seal every crack and cranny that I could find that stood to allow air leakage from my attic.


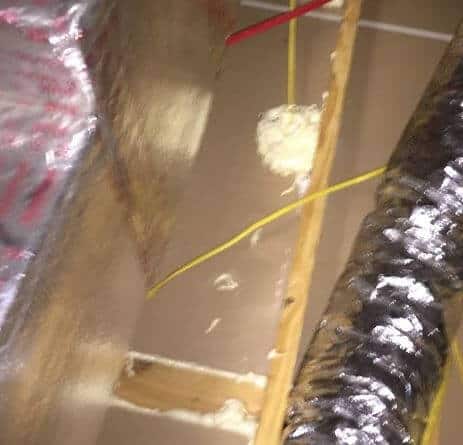
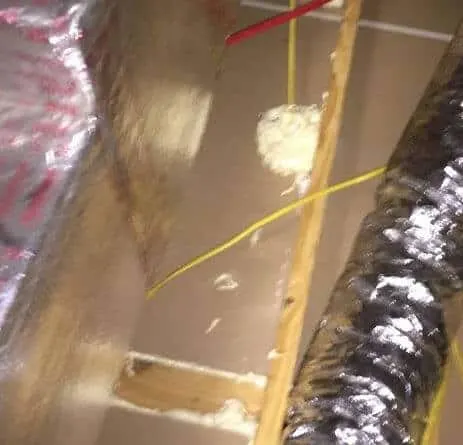
I really took the time before the insulation went in and I sealed every light fixture (we used insulation contact fixtures that can come into direct contact with insulation) and every joint where the sheetrock butted against a ceiling joist.
I can visualize the fruits of my efforts with my infrared digital thermometer. Compared to my previous home, there is a substantial decrease in the difference in surface temperatures between a random spot on the ceiling compared to the area around a light fixture.
Now, you make be thinking “good for you but that doesn’t help me because insulation is already blown in or laid in my attic”. The truth, however, is that by using an infrared digital thermometer you can still identify the most glaring problems and try to address them.
Trust But Verify – Professional Installers Make Mistakes Too
If your air conditioning vents are in an attic and accessible for inspection, it is worth the time and trouble to go in there and verify that all joints are properly sealed.
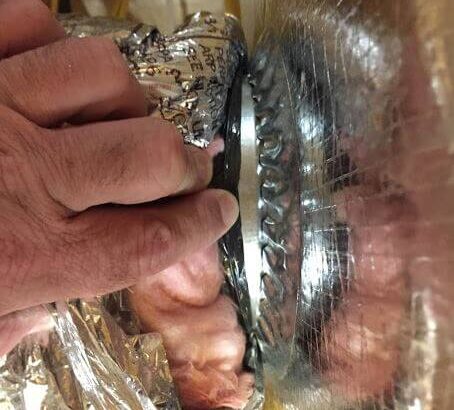
When we were building our new home, I double checked the work of the air conditioning installers and found that they have failed to use duct tape to seal the joints where the ducting split from the main trunk to each room. A cable tie was attached nice and tight but without ducting tape, the seams were not leak-free. I cannot imagine how much energy would have been lost every single day had I not found and fixed this myself.
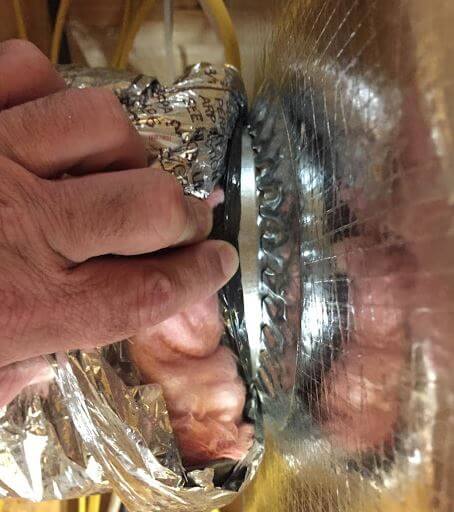

Once the issue was identified, however, it was a simple matter of working my way through the attic and taping up each joint with reflective duct tape. Once this was completed I knew that my air conditioning and heating that I was paying a pretty penny for each month would be traveling throughout my home to the appropriate rooms instead of air conditioning my attic!
It’s worth noting here that installing air conditioning ventilation systems in an attic is not the wisest choice for a home builder. Having a cooling system in a hot attic creates a hostile environment that constantly fights your system, trying to warm the air that you are spending money to cool.
If you are planning the building of a new home, working with your contractor on creative ways to keep your ducting system within the conditioned envelope of your home is a worthwhile endeavor. If you are dealing with an existing system that is already in the attic, however, your focus should be on ensuring that the ducting is properly sealed.
Conclusion
The bottom line is this. Before you can truly make your home more energy efficient, you need to get a firm grasp on exactly where your home is leaking energy, whether its from phantom power draws of electrical devices, insufficient insulation and sealing around outlets and light fixtures, or more likely, a combination of the two.
Again, these are the recommended products for quality checking the efficiency of your home:
Kill A Watt Electricity Usage Monitor
Infrared Digital Thermometer
And these are some of the simpler solutions to fixing those energy leaks once identified:
Outlet Plug That Supports Amazon Alexa
If you are ready to really dig into the details of your home’s energy efficiency, consider conducting a DIY home energy audit using my free guide and worksheet.
There are many more ways to save money on your electrical bill. Stay with us as we continuously add additional resources to help you ensure an efficient home.
One of the
As a homeowner, I am constantly experimenting with making the structure of my house more energy-efficient, eliminating pests, and taking on DIY home improvement projects. Over the past two decades, my family has rehabbed houses and contracted new home builds and I’ve learned a lot along the way. I share my hard-learned lessons so that you can save time and money by not repeating my mistakes.
Leave a comment
You must be logged in to post a comment.