
Bathroom remodels are a common do-it-yourself project. Replacing fixtures, flooring, cabinetry, and other finishes are fairly simple undertakings. But what about the bathtub itself? You may feel that old, worn, and cracked bathtubs and shower surrounds can spoil all the other efforts.
Can I install a bathtub myself? You can install a bathtub yourself if you are prepared to follow a detailed and sometimes frustrating process. Incorrect installation can result in water damage, an unlevel tub, and wasted money. Important factors that you need to consider include:
- Door width to move tub into bathroom
- Condition of existing flooring and plumbing
- Your knowledge and comfort level with basic plumbing, framing, and installation
I have installed quite a few tubs over the years, both new installation and replacements in existing structures. It can certainly be done but you need to understand some basics before getting into this.
Let’s walk through this process, coving the initial questions, potential setbacks, and installation instructions for a bathtub install.
Materials and Initial Questions
These initial questions may seem obvious, but without considering them, you may find yourself frustrated with the project.
- Door Width: Can you fit the existing bathtub through the door? Can you fit a new one in? If the doorway is narrow, you may need to remove the frame and possibly cut a larger space in the wall to fit the tub through.
- Space: What kind of space do you have to maneuver inside the bathroom? Often bathrooms do not offer much empty floor space for accessing and installing a bathtub. You may need to remove the toilet and/or sink to make space for sliding the tub in and out.
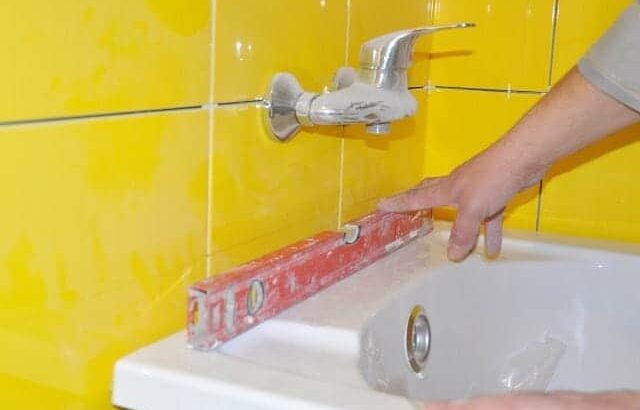
- Level Floors: How level are the floors in the space? Especially in older homes, you may need to level the floor under the bathtub area to ensure a proper fit, with no cracking and rocking of the unit.
Related Reading: Can Expanding Foam Be Used Under a Bathtub? Uses & Concerns
Once you have determined the answers to the above questions and completed any preliminary preparations, consider the materials you are handling.
If the existing bathtub is made of cast iron, you may not be able to handle the project alone. Cast iron is very heavy and difficult to maneuver.
If the bathtub is part of a one-piece unit, you may need to break it into pieces to get it out. Consider how much you can handle alone. Enlist help when necessary.
Next, consider the material for the replacement tub. Bathtubs come in a wide array of materials, each with pros and cons. Four common types are compared below.
| Material | Cost | Maneuverability | Durability/Temperature |
| Fiberglass | $250-$800 | Light, easy to install | Dulls over time, not terribly insulating |
| Acrylic | $300-$1000 | Light, easy to install | Fade resistant, warm, scratches easily |
| Enameled Steel | $150-$850 | Heavy | Sturdy, not insulating |
| Enameled Cast Iron | $375-$2200 | Heavy | Nice finish, warm |
In a do-it-yourself remodel, fiberglass or acrylic tubs are the easiest options because they are lightweight. Some come with attached surrounds, called one-piece tubs, while others include just the basin.
The one-piece would be almost impossible to fit into an existing bathroom; they are usually used for new construction.
Basin-only style bathtubs can be surrounded with shower panels, tiles, or other waterproof material. They also offer the easiest installation procedure, as they are less bulky.
As most tubs fit into a recessed area surrounded by walls, the ability to maneuver and fit into the space is extremely important.
Potential Setbacks

Once you have answered the initial installation questions, prepared the space, and determined your replacement material, you have a few more considerations to keep in mind.
- Size of Replacement Tub: Unless you want to create many problems, ensure the replacement tub is the exact size of the existing tub. Even a small, 1/4” difference can mean the walls will have to be adjusted to perfectly fit the new tub.
This can be accomplished with thinner cement board or furring strips, but if at all possible, avoid it with careful measurements.
- Drain Placement: Also, make sure you purchase a tub with the drain on the same side as the plumbing. Tubs are sold as left or right facing; unless you want to replumb the unit, buy the same.
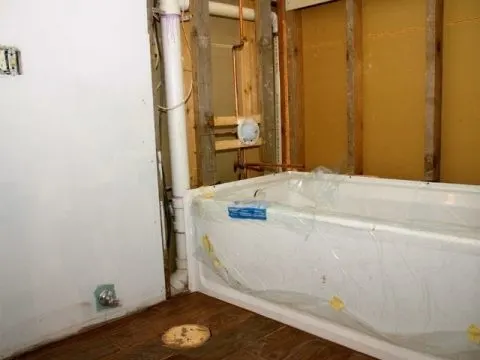
- Reframing: When you remove the old tub, you will likely uncover water damage. Water, mold, and mildew can damage the underlayment and walls from years of leaking caulk lines.
Be prepared to replace much, if not all, of the underlayment and insulation on the walls and floor with cement board, fresh insulation, and waterproof plastic sheeting. You may also need to replace some of the actual framing.
- Warranty: Often manufacturers’ warranties are not honored if a licensed contractor did not do the install.
It’s also a great idea at this point to invest some time in air-sealing and insulating the framing if the tub is against an exterior wall. This can help reduce the coldness of the new tub while improving the general energy efficiency of your home (source).
Basic Installation Instructions
Once you are ready to begin the installation of the new bathtub, here are some basic steps for the process.
- Access the drain pipes to turn off the water supply and remove the waste and overflow drains. You may need to cut a hole in the wall in another room adjacent to the tub, or access through the floor.
- Remove the old tub surround and caulking, and disconnect the tub flange from the wall studs before lifting the old tub out. Tilt on its side for easiest removal.
- Level floor as necessary, then fit new tub to mark flange height. Pull the tub back out of the space.
- Attach ledger boards horizontally based on flange height. This will be the board the tub “rests” on.
- With the new tub on its side, dry fit the waste and overflow drains and drain shoe. Use sealant to secure joints.
- If the tub manufacturer calls for it, prepare a mortar bed for the tub.
- Reinstall the tub, carefully sliding it to rest on the ledge board. Screw to studs.
- Connect drains to pipes through access hole. Reattach faucet plumbing. Replace any parts that are worn, leaking, or broken.
- Allow all sealant to dry, then test for leaks by filling the tub with water. Fix as necessary.
- Finish the walls by covering the studs and flange with cement board and waterproofing materials.
- Replace the tub surround, either with panels or tile.
- Seal any gaps with silicone sealant. Don’t forget the join between the floor and tub.
Watch this short YouTube video for an overview of the tub installation process:
Conclusion
With a little patience and lots of preparation, you can install a bathtub yourself. The most important elements to keep in mind are space constraints, measurements, and materials. Also, be prepared to do some preliminary repair work for water damage, leveling, and worn plumbing.
Unless you plan to completely reconfigure your floor plan, replacing and installing a bathtub can be a satisfying do-it-yourself project.
Related Reading:
- Can You Install a Bathtub Over Tile? Read This Before You Do
- Does a Bathtub Need a P-Trap?
- Why is My Bathtub Faucet So Loud? Troubleshooting Guide
As a homeowner, I am constantly experimenting with making the structure of my house more energy-efficient, eliminating pests, and taking on DIY home improvement projects. Over the past two decades, my family has rehabbed houses and contracted new home builds and I’ve learned a lot along the way. I share my hard-learned lessons so that you can save time and money by not repeating my mistakes.
Leave a comment
You must be logged in to post a comment.