
So you’re building a pole barn, and you’re wondering how far apart you should set the posts. Whether you’re using a manufactured pole barn or building one from scratch, properly setting the posts is crucial for smooth building experience, and a quality finished product.
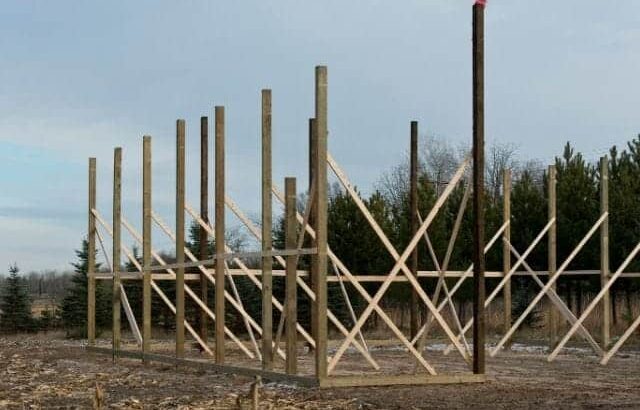
Pole barn posts should be set up either 8 or 12 feet apart, depending on the barn size and design. This width allows for even weight distribution and overall strength of the pole barn. You’ll want to make sure the posts you use are at least four inches by four inches, so they are sturdy enough to support the weight of the barn.
Read on to find out more about pole barns and how to set pole barn posts.
How Far Apart Should Pole Barn Posts Be?
The standard distance between pole barn posts is either 8 or 12 feet. Some custom-made pole barns may have different pole spacing, and tiny pole barns may benefit from having posts closer together.
If you are building your pole barn from a premade package, follow the instructions for assembly, including appropriate post spacing.
If you’re constructing your pole barn, decide whether you will need to customize your pole placement or go with the standard 8 or 12 feet. For the vast majority of pole barn styles, you’ll want to stick to the standard spacing.
Whether you choose to space your posts 8 or 12 feet apart will largely depend on your personal preferences and the size of your pole barn. Using 8-foot spacing for a more massive pole barn will require extra posts, requiring more ceiling trusses.
Setting posts 8 feet apart will give you a stronger foundation than 12-foot spacing, but setting them 12 feet apart is also an acceptable and often a preferred method.
Best Wood to Use for Pole Barn Posts
When building your pole barn, you’ll want to select posts made of solid, high-quality hardwoods less likely to rot in the ground or attract wood-eating pests.
Cedar posts are your best option, but they can be expensive and may not be as readily available in some locations. Other suitable types of wood include white oak, hemlock, black locust, pine, and hedge wood.
You can use treated wood if you prefer, but it isn’t necessary and won’t always last longer than untreated wood. Some people prefer to use old power poles for posts.
Power poles provide sturdy, long-lasting support, making them an excellent choice for your pole barn if you know where to find them.
How to Set Pole Barn Posts
After you’ve decided on the size of your pole barn and the type of posts to use, it’s time to start building your pole barn.
Measure and Outline Dimensions for the Pole Barn
If you have a blueprint or instructions from a pole barn kit, measure out the basic dimensions of the pole barn. If you don’t have a blueprint, you should at least have the necessary figures and dimensions written out for reference.
Mark the outline of the pole barn in the exact location it will go. Precise measurements are essential, and it’s always a good idea to do a few rounds of measuring before you commit.
Map and Mark Spots for Poles
Once you’ve marked the outline for the pole barn, measure the distance for each post and mark the spot where you’ll dig each hole.
Ensure the holes opposite each other line up precisely, as the posts will eventually support the ceiling trusses. If the posts aren’t square with each other, the alignment of the whole pole barn will be off.
Dig Hole for Poles
Dig your holes. You can dig by hand with a shovel or use a backhoe. Make sure each hole is at least three 3 feet deep and wide enough for the size of posts you’ll be setting.
Set Poles with Concrete
Set the posts in the holes and pour in concrete to anchor them in place. Depending on the number of posts and holes you have, you might consider hiring a cement truck to pour the concrete for you.
Once the posts are in place, use a level to make sure they are exactly perpendicular. Having level posts is essential for the stability of your barn, and will ultimately determine how strong the structure will be.
Finalize and Solidify Pole Position
Use a guidewire to make sure all the posts line up with each other. Readjust any post as necessary before the concrete has set. Once all the posts are lined up and completely square, allow the concrete to harden for 24 hours.
After the Poles are Set
If you want, you can bring in sand, gravel, or concrete for the floor of your pole barn, or you can leave it as-is.
After the posts have set, it’s time to build your roof. Attach a beam running lengthwise down each row of posts, to act as a base for your ceiling trusses. Build your trusses according to your blueprint or instructions. You can also buy premade trusses. Set each truss in the appropriate spot and anchor them to the beams with metal plates and screws.
Attach purlins and cross beams to the roof and sides of your barn according to the blueprint or kit instructions. At this point, you should be ready to add on the roof and wall materials.
At the roof, nail each steel or aluminum panel to the purlins, overlapping the edges to prevent leaking. Install ridge caps at the top of the roof. It’s also a good idea to use caulk on the overlapped sections to fully seal them.
Work your way down to the walls, nailing each wall panel to the posts and cross beams, making sure they overlap and ensuring no gaps open between them. Caulk the overlapped sections as you did with the roof.
Install whatever type of door you need to make your pole barn functional. At this point, you can turn your attention to the pole barn’s interior, adding stalls or shelves or any other features you want depending on what you intend on doing with the pole barn.
Why Choose a Pole Barn?
A pole barn belongs to a family of structures called post-frame constructions, which are considered quicker and easier to build than other structures.
Pole barns have no foundation; instead, the corrugated steel or aluminum panels that make up the walls and roof are supported by a framework of wooden posts, or “poles.” This makes them slightly more comfortable for a landowner to build on their own without pouring a foundation.
Pole barns are often used on farms and homesteads for storing farm equipment or animal feed. Some people even use them in place of traditional barns to house their farm animals or a stable for horses.
However, pole barns are exceptionally versatile buildings. They can be used for lots of other purposes as well, including as a garage for your vehicles, large storage shed, or even as a man cave.
Pole barns are built to withstand snow, rain, wind, hail, and extreme temperatures. That’s why it’s so important to anchor your poles deep enough and space them correctly.
The posts will provide your pole barn’s only foundation, so spacing them properly is essential to avoiding headaches later on in the building process and increasing the durability of your pole barn.
Conclusion
Ensuring your pole barn posts are within the range of 8-12 feet apart is the best bet for a sturdy and durable pole barn. There are lots of different pole barn designs and uses, but the basic construction will be the same process for most pole barns.
If you’re new to building structures of any kind, it’s a good idea to start with a premade pole barn kit, which will provide detailed instructions to help you throughout the process.
If you follow your blueprint and remember to line all your posts up accurately, the rest of the build should be a breeze.
As a homeowner, I am constantly experimenting with making the structure of my house more energy-efficient, eliminating pests, and taking on DIY home improvement projects. Over the past two decades, my family has rehabbed houses and contracted new home builds and I’ve learned a lot along the way. I share my hard-learned lessons so that you can save time and money by not repeating my mistakes.
Leave a comment
You must be logged in to post a comment.