
Battery failure is often the result of poor battery care rather than technical faults in the batteries themselves. There are several reasons why your battery may not charge, and most of the solutions are relatively simple.
If your camper trailer battery is not charging, the way to troubleshoot is to check for corrosion, battery charge health, and converter issues. Your circuit board may have blown fuses, diodes, and resistors, or the shore power may be at fault. Proper maintenance is the key to battery health.
Before you call in the help of a professional, there are ways to discover battery issues yourself. If you would like to learn what common battery charge problems are and how to fix them, read on.
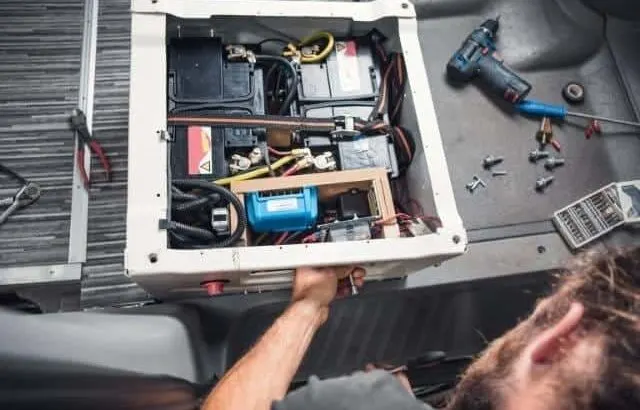
How Do RV Batteries Work?
Flooded lead-acid batteries are most popular and can be a maintenance-free type or the manual maintenance battery type with removable caps. VRLA batteries are slightly more expensive and are ‘valve regulated lead acid’ batteries that use a specialized system to suspend the electrolyte in a gel or glass fiber type mat. Gel batteries use battery acid in the form of a leak-proof gel which makes them great for marine applications.
However, gel batteries are not the best choice for RV applications as they need to be charged at a slower rate than flooded cell batteries, and overcharging can easily cause your battery irreparable damage. AGM or Absorbed Glass Mat uses a specialized mat between the plates, which is soaked in electrolytes and charged similarly to lead-acid batteries but does not leak or require water and is maintenance-free. They are quite costly, however.
Battery Life Maintenance
The longevity of your trailer battery depends on you. If you use the battery properly, ensure it is maintained, appropriately discharged, and stored correctly, you will significantly increase your battery lifespan. The most crucial factor to battery life is how deeply the battery is cycled each time.
One battery cycle is when you run the battery from fully charged to 50% and back up to 100%. One should consider your battery’s amp hours and halve it because you should not let your battery run down below 50%. Your battery’s life expectancy depends on how soon a discharged battery is recharged and should be done as soon as possible after discharging your battery.
There are several reasons why your trailer battery might not be charging, and most of these reasons are maintenance based.
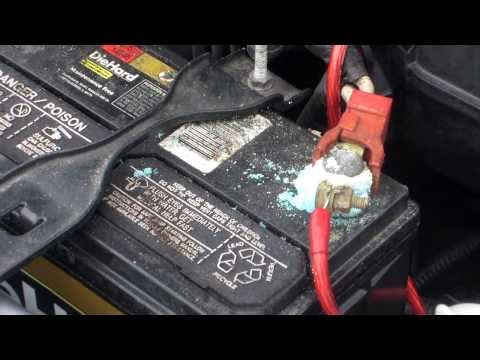
Corroded Battery Connections
The most common reason for your battery failure is sulfation. Sulfation occurs slowly over time as the battery goes through numerous charge and discharge cycles and leads to the formation of sulfate crystals. The greenish-white build-up around your battery may prevent a proper connection to the rest of your RVs electrical system and prevent it from charging. Sulfation increases dramatically if:
- Your battery is overcharged
- Your battery is undercharged
- Stored in a discharged state
- The electrolyte levels drop below the lead plate and expose the plates to air.
Proper treatment of a battery after discharge will help prevent sulfation and maintain your battery’s electrolyte levels. One should check for battery electrolyte levels at least once a month, and you should fully charge your batteries before you perform maintenance as charge levels may change your electrolyte levels.
How to Remove Corrosion
It would be best if you cleaned your battery terminals to remove the corrosion in this simple process.
- Disconnect the battery by removing the cables from battery terminals starting at the negative terminal and taking care not to touch both terminals at once.
- Pour a small amount of baking soda directly onto your terminals in a ring to neutralize the sulphuric acid before you clean it off.
- Take a soft brush such as a paintbrush dipped in water and applied it to the baking soda rings, ensuring you do not splash the mix. Allow the mixture to fizz for a minute or two to neutralize the acid.
- Then take a more rigid brush such as a toothbrush and scrub and carefully scrub the baking soda and water into the terminal posts. Clean the cable clamps paying particular attention to the inside of the clamps where the connection is made to the terminal.
- Let the mixture sit for a couple of minutes before wiping the terminals with a clean rag. Ensure you do not get the mixture on your hands, trailer, or clothes to create burns.
- Seal the battery terminal with a high-quality sealant spray available at auto part stores to prevent future corrosion.
This video from YouTube demonstrates removing battery corrosion with baking soda:
Your Battery Is Losing Its Charge
To determine if your battery is no longer capable of holding a charge, follow these steps:
- Charge your battery for a couple of hours until it is fully charged.
- Disconnect your battery from the RV to isolate the battery’s electrical system.
- Allow your battery to rest for an hour, and then use a multimeter or a voltmeter to check that the battery still maintains its full charge reading.
If you find that your battery voltage numbers have declined, then the problem is with the battery itself. You will either have to replace the batteries with a new one or find a battery specialist who may recondition your battery. If your battery is not losing power, then you will need to troubleshoot further.
Your Converter’s Cooling Fan Has Failed
Another common reason why your battery won’t charge is a fault in your converters cooling fan or thermal sensor. The converter fan is essential in keeping the internal components cool, and if the fan fails, the converter may overheat and lead to shorts in your battery system.
- Inspect your converter carefully for signs of burned wires or smells of burning, or any other visual clues.
- Connect your multimeter to the fan’s power source and ensure that the fan is receiving power.
- If there is insufficient power to your fan, it is clear that you will need to replace the converter fan.
If your fan is still receiving power, but there is still excess heat or a burning smell, your fault may lie in the converter’s thermal sensor. You would need to check the temperature sensor with a multimeter and replace the part from the manufacturer. We recommended that you seek a professional for thermal sensor replacement as the process can be quite tricky.
Your Circuit Board Is Faulty
Power surges from a shore power source may often cause a breaker or fuse to trip. You should investigate each one to ensure that they are operational and replace them if they are faulty. If there is not an obvious fault in the circuit:
- Remove each fuse or switch off each circuit breaker.
- Turn on the appliance listed for each circuit and switch the breaker on or reinstall the fuse.
- Through a process of elimination, check each circuit to ensure the circuit board is not faulty.
If the problem is with a burned out fuse, you may replace the part easily. If a circuit breaker is at fault, you should arrange the services of a licensed electrical contractor.
Next, you should ensure that there is not a corrosion problem on the circuit board itself.
You will need to unscrew your circuit board’s housing panel and investigate your circuit board’s interior. If there is a flaky white residue in the internal workings, corrosion is usually the problem.
- Disconnect all power sources.
- Mix 12oz of water to one teaspoon baking soda.
- Gently swab the affected area with a q-tip.
- Dry the area thoroughly with a clean paper towel.
Resistor or Diode Failure
Resistors and diodes function to convert your power source from AC to DC voltage and often burn out if the temperature spikes. You will be able to tell by eye if there is a burned-out component on the circuit board. Unless you are experienced in electrics, you should seek a qualified professional’s services to replace the faulty parts.
Shore Power Failure
Before you blame your battery for the charging fault, ensure that the power post is not faulty should you find yourself in an RV park. Power posts may also burn out or be damaged, and it could be responsible for the fact that your battery is not charging. If there is a power post issue, you would need to let the park management know to rectify the problem.
Conclusion
Battery maintenance and care are essential to achieve your trailer’s full lifespan. Prevent your battery from standing in a low state of charge, keep your depth of discharge at 50%, and regularly check your battery water levels.
Keep your battery clean of corrosion and free from dust and debris, and perform regular checks on your battery health. The most common failures in trailer batteries are the result of poor maintenance, so keep up your maintenance routine to ensure you remain a happy camper.
Sources
- Battery university: Charging Information for Lead Acid Batteries
- Electric Problems: Deep Cycle Battery Won’t Fully Charge?
- Battery Equaliser: Battery Maintenance Facts
- Trailer Life: Understanding and Maintaining Your RV Batteries
As a homeowner, I am constantly experimenting with making the structure of my house more energy-efficient, eliminating pests, and taking on DIY home improvement projects. Over the past two decades, my family has rehabbed houses and contracted new home builds and I’ve learned a lot along the way. I share my hard-learned lessons so that you can save time and money by not repeating my mistakes.
Leave a comment
You must be logged in to post a comment.